
Kefir without tears
Actually, there's no need for tears at all, it's a doddle making your own kefir, but why waste a good title?
How to make your own kefir
The first thing you need are some kefir grains, which are little clusters of culture (bacterial, not Proust-reading). If you can't find someone with spares to give you they're easily and cheaply bought as mail order on t'internet.
If you buy them, the grains will come with instructions, which will be variations on the theme of "put the grains in milk and wait".
There are only two rules
- Kefir grains don't like contact with metal
- Kefir grains don't like contact with chlorinated water, but I'm not sure why you'd want to do that.
- So it's just rule 1 really. No metal
Put your kefir grains in milk - but don't get stressy
When I started making kefir I was a bit precious and only used full fat organic milk, preferably raw, but actually they seem just as happy in semi skimmed from the milkman, the choice is yours. Other liquids you can similarly ferment with the grains, but I've stuck with milk.
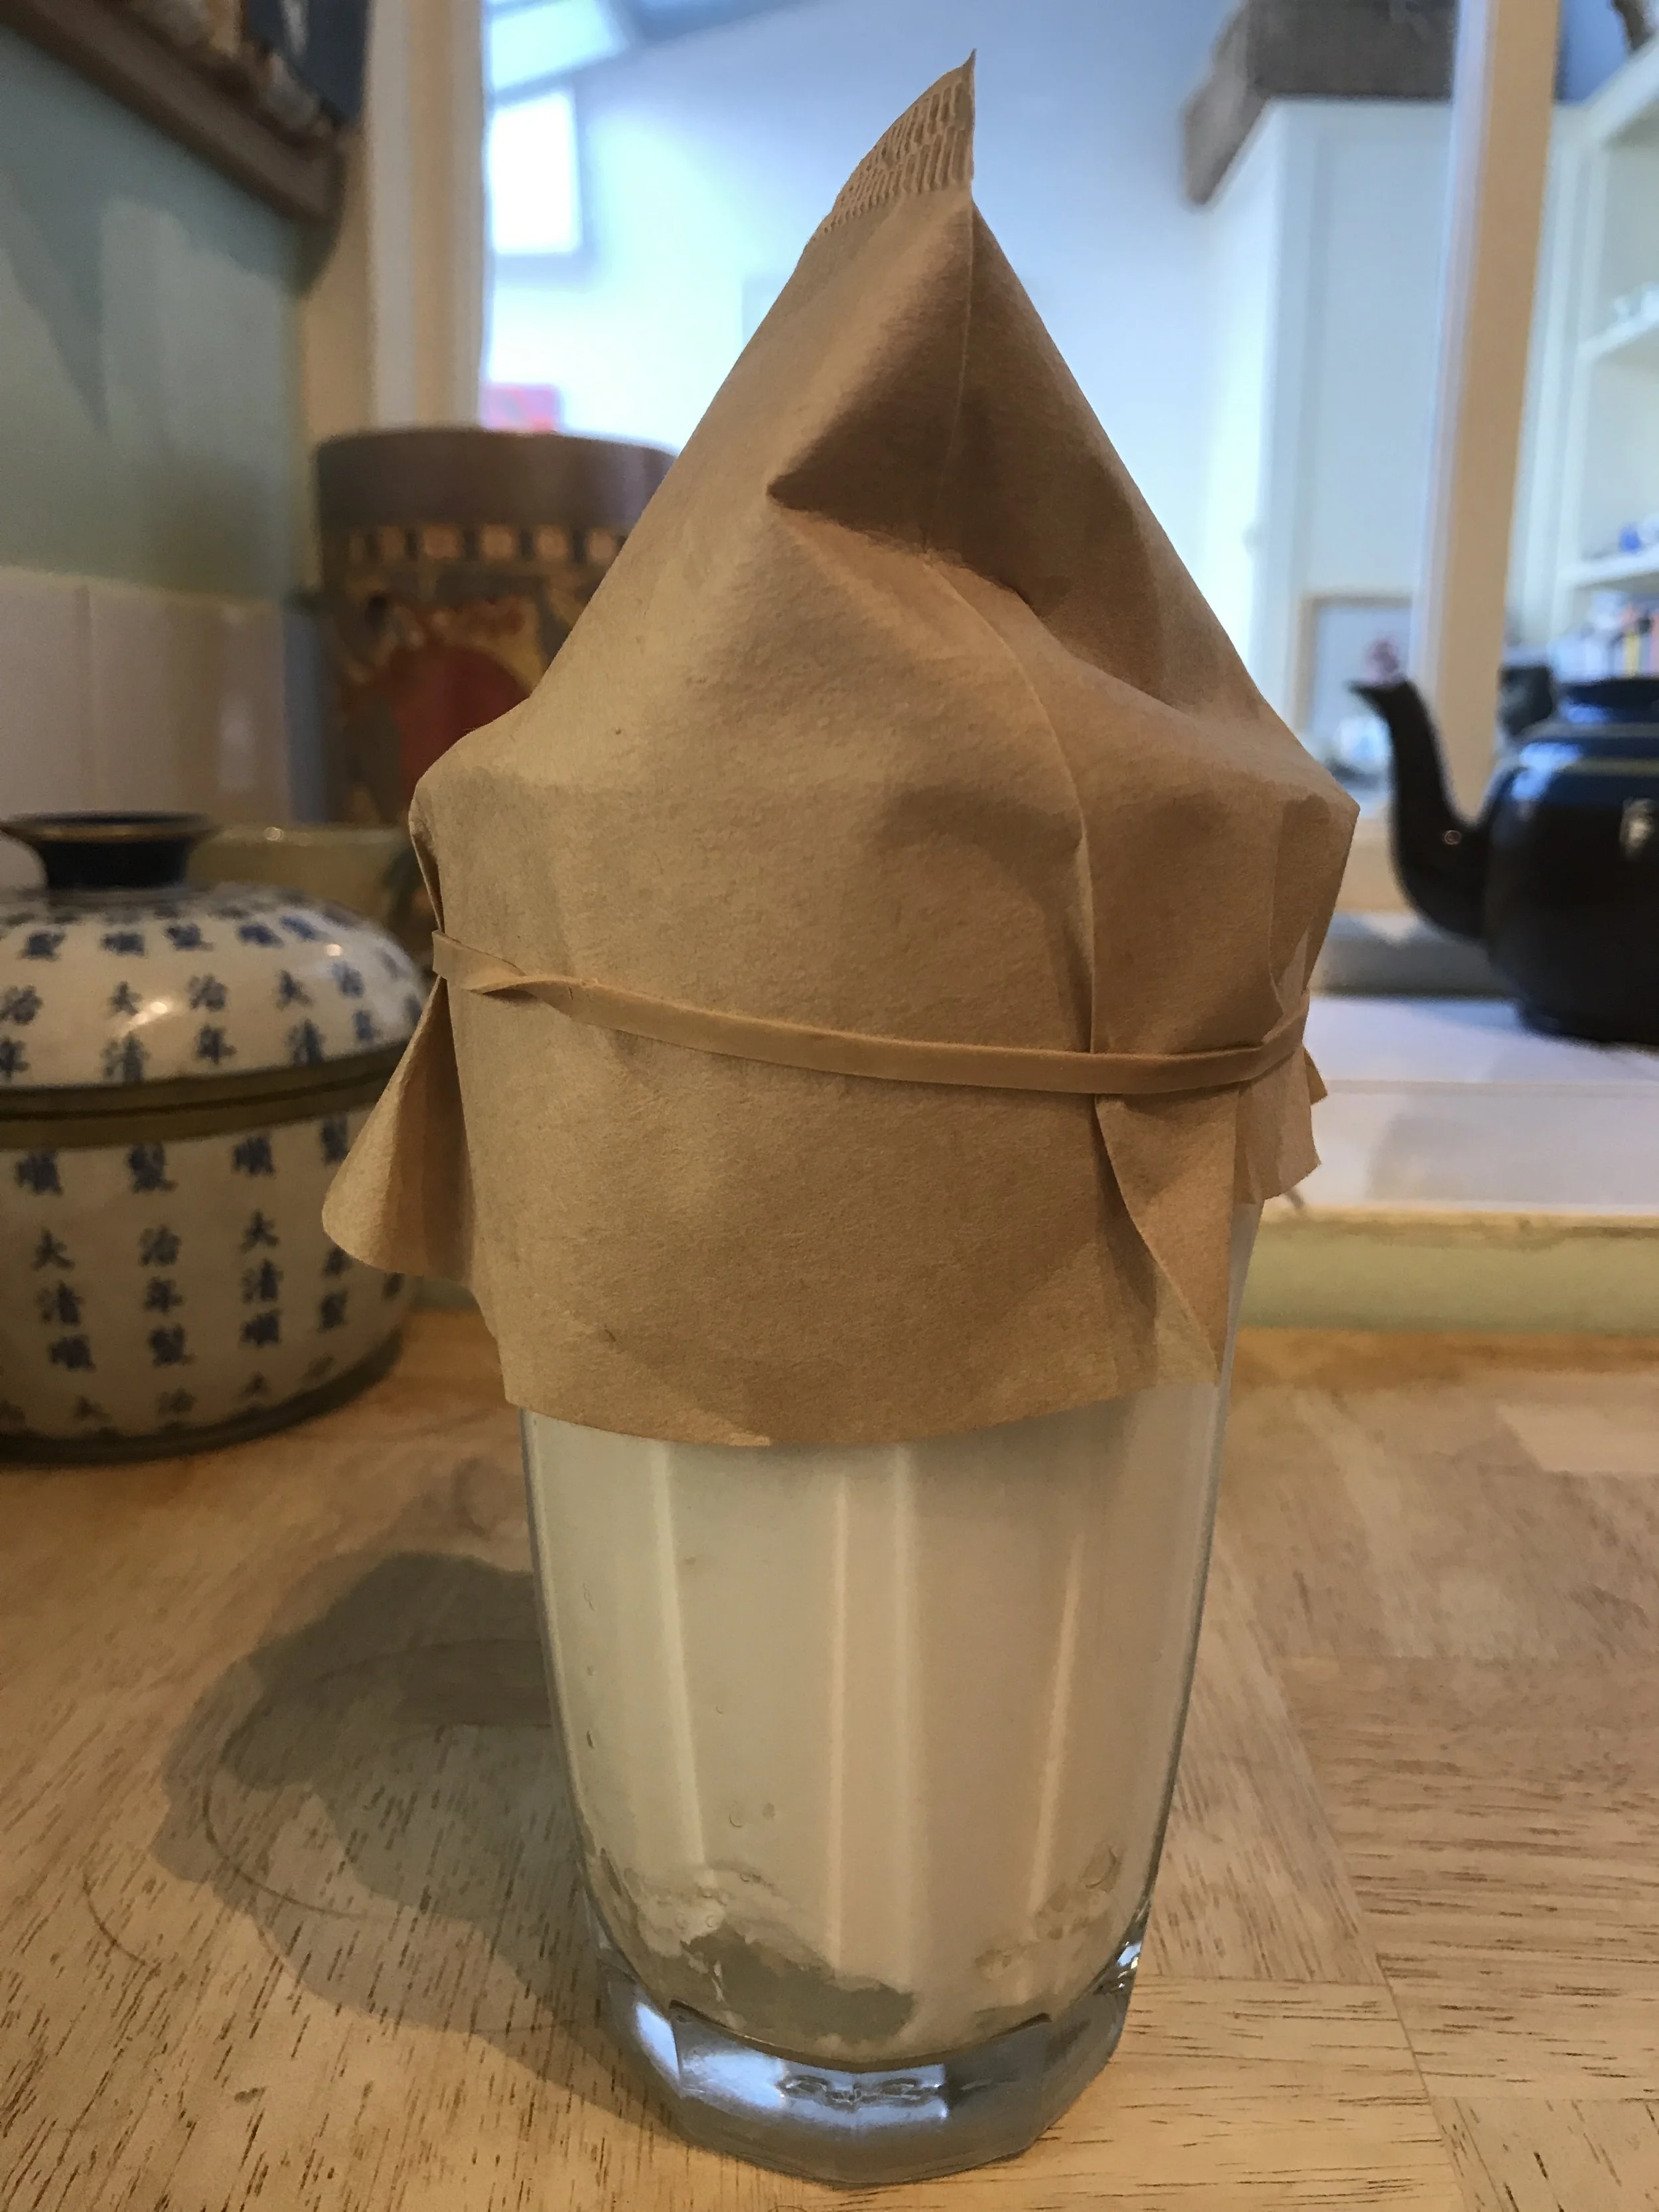
I've used different containers, but ended up with a drinking glass (for ease of washing up), and making a jaunty hat from a coffee filter and an elastic band. I use about 1/2 pint of milk.
Leave the jar of milk and grains at room temperature for around 24 hours, maybe giving it a little stir with the end of a wooden spoon, and, bingo, you've done it. You're practically from the Caucuses. Do not worry if there is separation, that's fine.

If your kitchen is particularly chilly you might want to find a warmer spot, I put mine on the boiler (which is well insulated, so just slightly warm) in the winter. Mostly it just sits on a work surface though.
Sieve.
You now want to retrieve the grains. The method I've landed at is to place a plastic sieve in a cereal bowl and tip the contents of your kefir glass in the sieve. Swill and jiggle it about in the bowl until all you have in the sieve are the grains.


Plonk the grains in another glass, add milk, pop its hat on and off you go again, ready to repeat every day.
The grains will increase, so either donate any spare to a friend or dispose of them.
What's kefir like?
The kefir I make varies a bit each day, but essentially it's like a runny yoghurt. sometime with a bit of fizz. I tend to use it as a breakfast, with nuts and seeds and fruit added. It's also lovely as a drink with a square of chopped up chocolate, some chia seeds and a good shake of cinnamon and maybe some finely chopped mint leaves.
The only limit is your imagination (or Pinterest)
Make it stop!
If you need to cease production for a while, pop the grains in some fresh milk and store it in the fridge.
If you're inspired to ferment more, here's my easy kimchi recipe.
Pork Pies? It's child's play
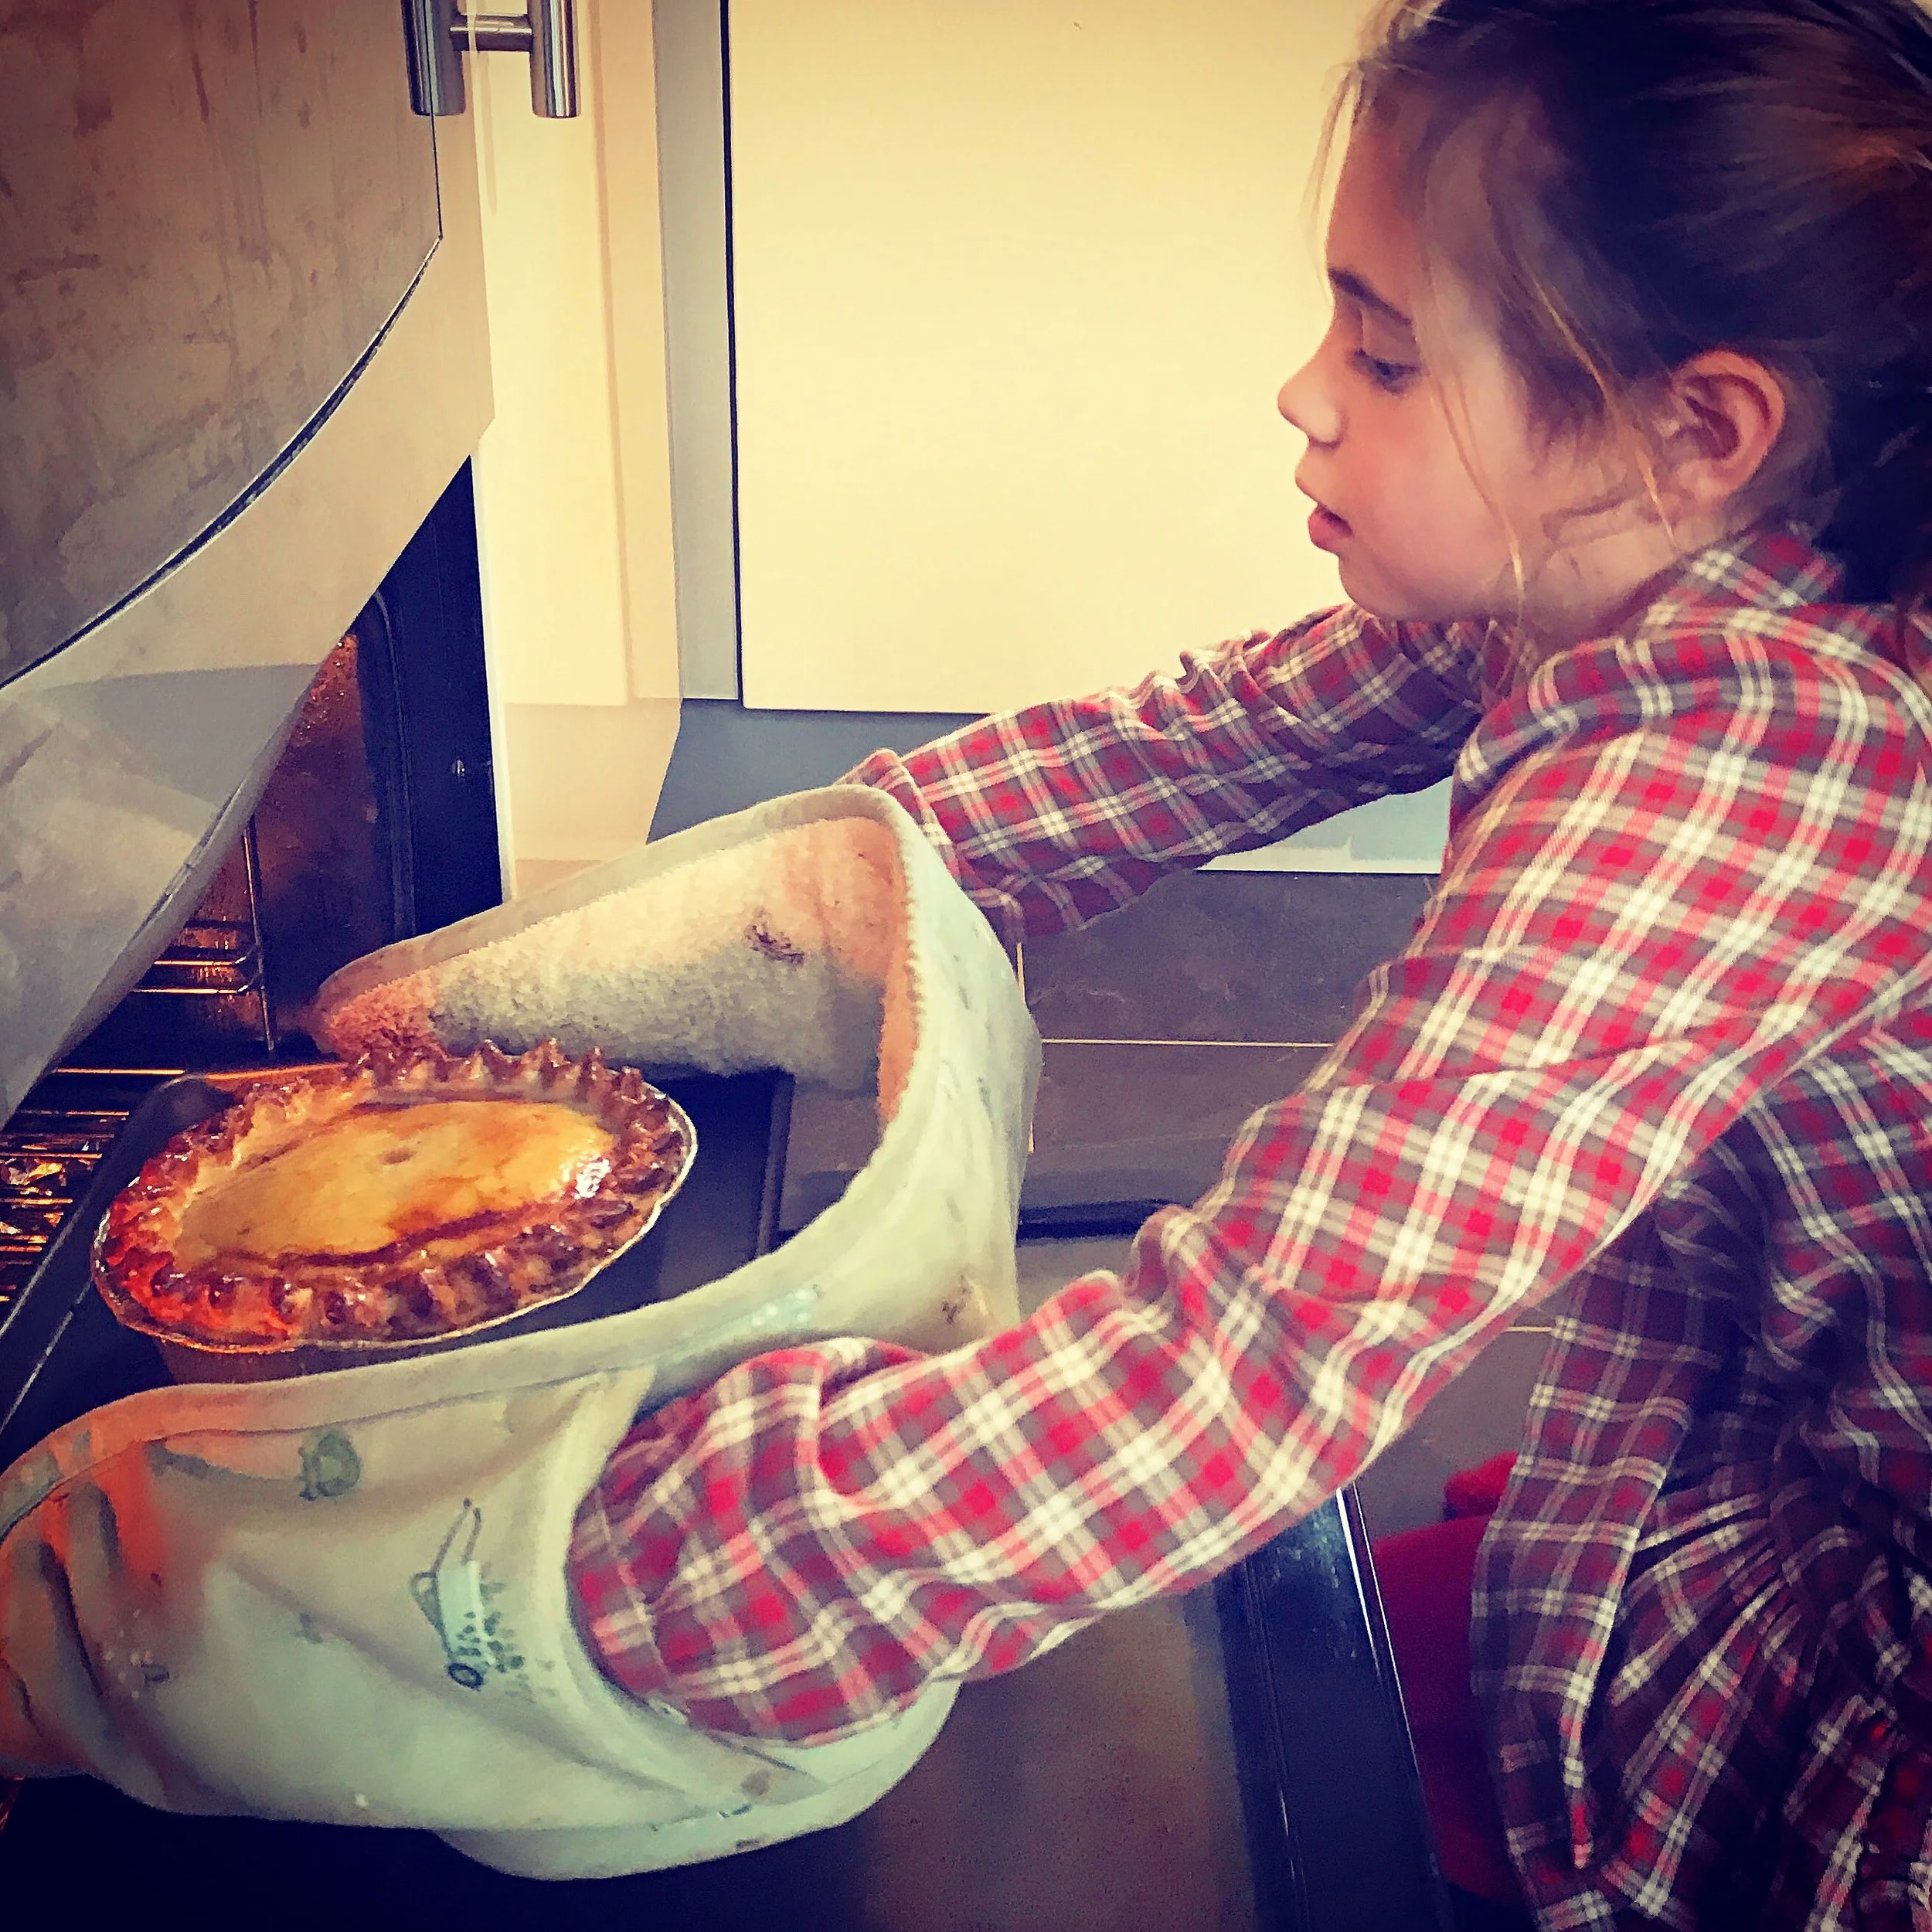
It probably hasn't escaped your attention that, in our Pies By Post shop, we don't only sell pork pies that are ready baked, for years we've also sold frozen ones for you to bake at home (with full instructions). We always say that it's really easy and here's the proof. This is one of our customer's daughters. Isn't she brilliant?

How to bake a pork pie
It probably hasn't escaped your attention that, in our Pies By Post shop, we don't only sell pork pies that are ready baked, for years we've also sold frozen ones for you to bake at home (with full instructions). We always say that it's really easy and here's the proof. This is Madeleine, the daughter of one of our customers baking their pie last Christmas. Isn't she brilliant?

Carefully does it
We've decided that this is the new staff uniform.
How to glaze a pork pie

Glazing like an expert
Anyway, the point is that they are terrifically convenient, you can take one out of the freezer (no need to defrost) and let the magic commence. We sell them in several sizes, this is a large one. If you've never smelt the deliciousness of a pork pie baking then you are really missing out on one of life's greatest joys. You definitely need to put that right. Click here immediately...
Dad Brendan sent us these photos when he sent us his Christmas's order today. And there's no greater recommendation than a repeat customer. Thanks Brendan (and Madeleine - you've got a job with us, as soon as Dad lets you).


Is a pork pie course right for me?
Everyone naturally has a few concerns, whether you're buying a cookery course for yourself or as gift for someone else. So I thought I'd write a blog post to lead you through everything so you can be sure that its right for you. I even asked on social media what people's fears might be.
Honestly. There's nothing to be worried about - it's all very un-scary.
The cookery school is run by ex hospital consultant and now pâtissier (which means he has a gorgeous cake shop) Dr Tim Kinnaird. Tim and I have been good friends for a long time and we're keen that people have fun whilst they're with us, as well as learning something new.
You are in very safe hands, Tim and I know that pork pies are probably a new skill, but we make it all surprisingly easy. And we'll teach you how to make puff pastry as a bonus.

Everyone naturally has a few concerns, whether you're buying a cookery course for yourself or as gift for someone else. So I thought I'd write a blog post to lead you through everything so that you can be quite sure. I even asked on social media what people's fears might be and they're all covered here.
Honestly. There's nothing to be worried about - it's all very un-scary.
The cookery school is run by ex hospital consultant and now pâtissier (which means he has a gorgeous cake shop) Dr Tim Kinnaird. Tim and I have been good friends for a long time and we're keen that people have fun whilst they're with us, as well as learning a new tecnique or two to take back to your own kitchen.
You are in very safe hands, Tim and I know that pork pies are probably a new skill, but we make it all surprisingly easy. And we'll teach you how to make puff pastry as a bonus.
Who comes?

The attendees are pretty equally men and women. People do come with friends, or partners, but most are having a day out on their own.
We kit you out with an apron and you start off with coffee and ridiculously delicious cake in Tim's reception room, with its comfy squishy red sofas, and it all gets nicely chatty from the start. Frankly, by lunchtime we find there's no getting a word in!
If you've got any concerns about any physical issues you've got and how you'd deal with them in the class, give Tim a call before you book and you can chat them through.

There'll be a maximum of eight people and Tim and I are always with you, helping as you put into practice the things we show you.
There's always a range of cookery experience in the room, from beginners to quite experienced home cooks. Some will have signed up for themselves and others will have been given the course as a present. Often there's an "old hand" who's previously done one of Tim's sweet baking courses and enjoyed it and fancied a foray into savoury.
A cookery school? What does that mean?

Tim's cookery school is at his production kitchen on the Norwich ring road so it's very easy to find, even for the geographically challenged like me, and there's plenty of parking (and a train station and airport). We've had people come from all over the country, and being in the city there's a wide range of hotel and B&B accommodation if you need it.
It starts at 9.30 (we like you to be there a little early) and finishes around 1, to 1.30.
In the cookery school area a horse-shoe of eight work surfaces, like domestic kitchen, each with its own oven and Tim and I stand at the front explaining and doing each bit so everyone can see what we're doing.
All the equipment that you need is there and you'll get given pre-weighed ingredients, so you just have to concentrate on learning what to do with it and producing lovely pies and sausage rolls. Everyone works at the same pace, you do it step by step, and we're always by your elbow cheering you on or are happy to get hands-on helping you with any fiddly bits.
Best of all, one of Tim's team whisks away all the washing up!
We have regular breaks for a drink and (more) cake, and then, whilst your pies and sausage rolls are in the oven, with the team overseeing them for you, you get to relax and Tim serves a DELICIOUS lunch.
As the pies and sausage rolls come out of the oven there's always lots of congratulatory cooing and "Did I make that?".
Will I be able to do it?

We've had all sorts of people and everyone always proudly takes home the lovely box of pork pies and puff pastry sausage rolls that they've made. Plus a huge dollop of confidence and satisfaction.
So whether you're thinking of coming along yourself or buying it as the best Christmas present for someone - go for it! We'll see you there!

The day Kate came to play with pastry
We know what we like and the Great British Bake Off is one of those things, we adore the gentle fun of it, the way a nation has convened around it and the fact that it's got people into their kitchen, inspired to learn skills to feed themselves and their friends and family. And we do like the contestants, who seem to be particularly nice human beings.
We've really hit it off with Kate Barmby from this year's series,
We know what we like and the Great British Bake Off is one of those things, we adore the gentle fun of it, the way a nation has convened around it and the fact that it's got people into their kitchen, inspired to learn skills to feed themselves and their friends and family. And we do like the contestants, who seem to be particularly nice human beings.
We've really hit it off with Kate Barmby from this year's series, through our shared interests in art, swallows and Norfolk, so we've enfolded her into the floury Bray's Cottage world and she's come up to HQ a couple of times, and what's more she's brought us (oh it was so good) cake!

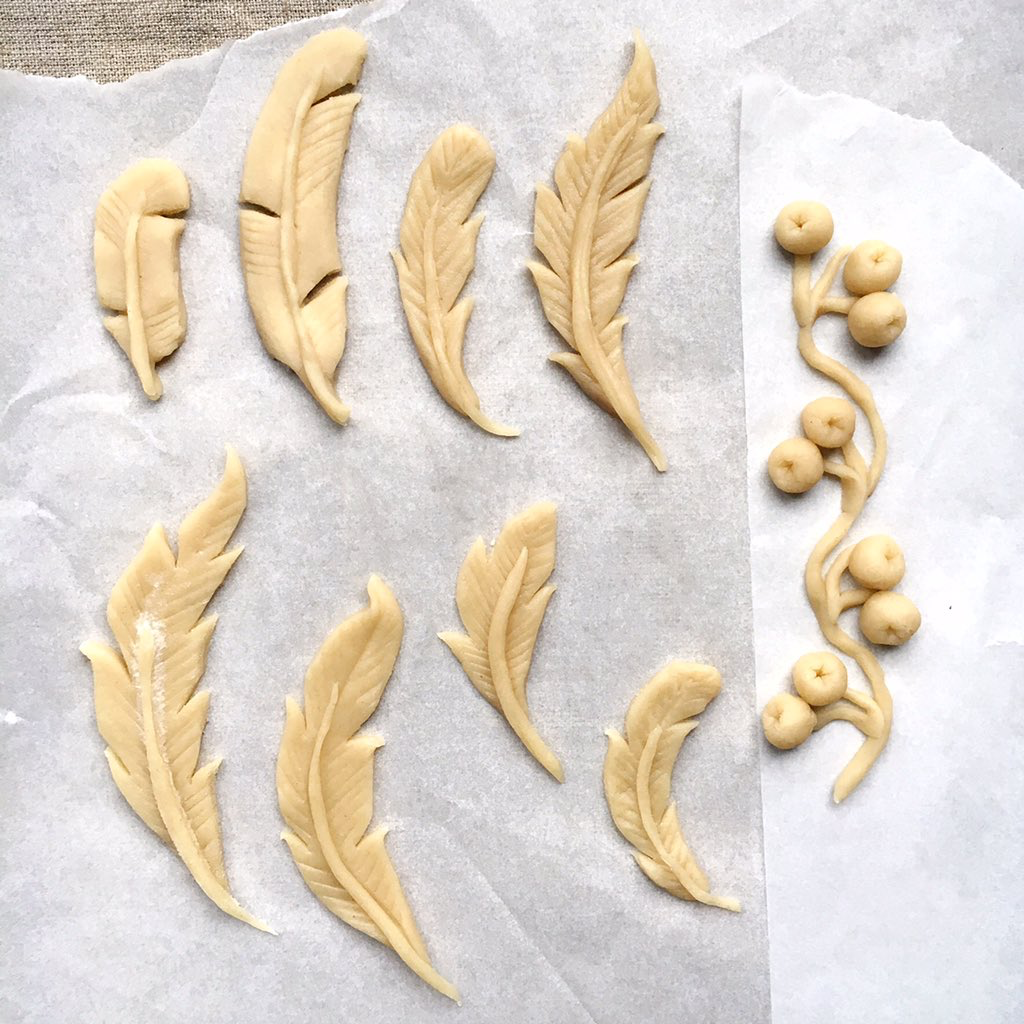
Kate Barmby, with pastries
So, a week or so ago we set aside a whole day and a corner of HQ (which was a-bustle with Thursday pie baking) for pastry play with Kate. She came bristling with ideas and a scrap book of inspiration. It coincided with a day that Emma, a key member of our creative team and a craft star in her own right, was at HQ and hot water crust pastry sculpting synergy was unleashed.
Because of her cake and art background, Kate is an expert in sugar craft so she brought multiple tool boxes of sugar-craft implements and, as Pastry Manager Erin kept them supplied with raw materials, the pair set to work pushing the boundaries of where hot water crust pastry meets sculpture.

Emma crafted beautiful hawthorn berries and Kate created the most glorious feathers, which were actually inspired by a magazine picture of a feather fascinator worn by that other Norfolk Kate, HRH Duchess of Cambridge.
There was also much laughter and gossip - which we couldn't possibly reveal (unless plied with very fine wines).
The results were breathtakingly stunning. We're so thrilled with where a friendly chat over coffee in HQ has taken us, rediscovering British pie decorating traditions with a very modern slant.
We've decided there will be more to this story - watch this space...

Join the great British craft pastry revival...

If you'd like to learn how, we hold regular pork pie workshops in Norwich (they also make extremely welcome Christmas presents) and we incorporate pie decoration tips. The courses are held at the Macarons & More Cookery School and you can book online.
You can buy our frozen uncooked pork pies online and add beautiful decorations yourself (hot water crust pastry is very easy to make) at home. If you do feel inspired, we'd love to see the results of your efforts - drop us an email or get in touch with us on Twitter.
We also make bespoke celebration pies with your own message written in pastry (though not with Kate Barmby feathers....yet).

Kimchee
Kimchi (kimchee and various other spelling variations) is cropping up all over social media at the moment, and I'm sure it'll be in the cookery pages imminently. I hereby declare you to be at the cutting edge of the zeitgeist. And if you give making it a go you'll be even more so.
It's simple preserving of vegetables using lacto fermentation, which for some reason isn't really in the British cookery repertoire, we seem to favour sugar and vinegar in our funny old medieval way. But most of the rest of the world does some form of it, using naturally occurring "good" bacteria, in the same way as yoghurt or cheese does (notably sauerkraut). So

Kimchee - salty, sour hot, the new best accompaniment to a pork pie
Kimchi (kimchee and various other spelling variations) is cropping up all over social media at the moment, and I'm sure it'll be in the cookery pages imminently. I hereby declare you to be at the cutting edge of the zeitgeist. And if you give making it a go you'll be even more so.
It's simple preserving of vegetables using lacto fermentation, which for some reason isn't really in the British cookery repertoire, we seem to favour sugar and vinegar in our funny old medieval way. But most of the rest of the world does some form of it, using naturally occurring "good" bacteria, in the same way as yoghurt or cheese does (notably sauerkraut). So I think it's no bad thing to get a new technique under your culinary belt. I first had kimchi when Dr Tim Kinnaird made it for one of our cookery school lunches recently and, encouraged by him, decided to give it a whirl, and it's remarkably easy. The end result is a delicious salty, hot (as in spicy), sour pickle - which funnily enough goes BRILLIANTLY with pork pies. It's like pie with mustard but more complex and even better.
What you'll need
Leaves - I recommend starting small to get your confidence up, so, say, a couple of pak choi or a small hipsi (sweetheart) cabbage
Sea salt
Chilli powder, ideally a mild one
Fresh ginger
Garlic
Non metalic bowl
Container without a metal lid (a small clippable La Parfait jar is perfect)
Gloves (optional)
How to do it
My method is a distillation of dozens of (often conflicting) sources of information in books and the internet. It's definitely not authentically Korean, we'll call it the Imprecise Norfolk Kimchi. But they are all essentially doing much the same thing.
You can probably make kimchi just by reading my headings, but there's more detail below each one.
Salt your veg

So, first take your vegetable. I've made it with Pak Choi and Hispi cabbage so far, but you can do it with anything of that nature, I'm keen to try red cabbage and lovely Thom Eagle of Darsham Nurseries restaurant recently did it with kale "ribs" (the tougher bit running up the centre of a kale leaf). He's also gone bonkers with rhubarb kimchi, but that's chefs for you and we can quietly ignore that for now. Carrots and other vegetables are often added too.
Chop the afore mentioned vegetable and put in a non-metallic bowl and mix in a good sprinkle of sea salt. A lot of sources say it's important to use sea salt (such as Halen Mon or Malden) as everyday table salt has anti-coagulant chemicals that inhibit fermentation. So I'm happy to go with sea salt.
There's a lot of imprecision about the quantity of salt, but the salt isn't preserving the leaves, it's drawing out moisture, and adding flavour, so a good sprinkle is precise enough I think!
Leave the bowl for a couple of hours, stirring (with something non metallic) occasionally. You'll start to see the contents gradually becoming wetter and floppier as the salt starts to cause moisture to come out of the leaves.
Give the water that comes out a taste. One source I read said the water should taste of salt, but not "surprisingly" so. Which I rather liked, I think unsurprisingly salty is a good thing to aim for.
Make a tasty chilli/garlic/ginger paste
The favouring of kimchi is essentially chilli, garlic and ginger (and all the better for that). There's a lot of hoo-ha about the chilli powder, which should authentically be Korean. I haven't got any of that, although it is easily available on line and at good Asian supermarkets. I happened to have a fairly mild Mexican chipotle powder, and very nice it is too.
If you use standard supermarket chilli powder you'll probably want to use less of the resulting paste with your cabbage, for heat reasons. And almost all standard chilli powders have cumin in, so be aware that you're getting that flavour too.
Blend about a desert spoon of chilli powder with a small knob of fresh ginger (equivalent to around a level teaspon) and a clove of garlic. One of those mini food processors is excellent for the job, but a good sharp knife or a pestle and mortar would work well too.
Taste a little of the paste to get a sense of how much heat you've got - we're all different in our heat tolerances. Incidentally, the paste is a very acceptable condiment in itself, we had a little left over with some cheese on toast and were very taken with it.
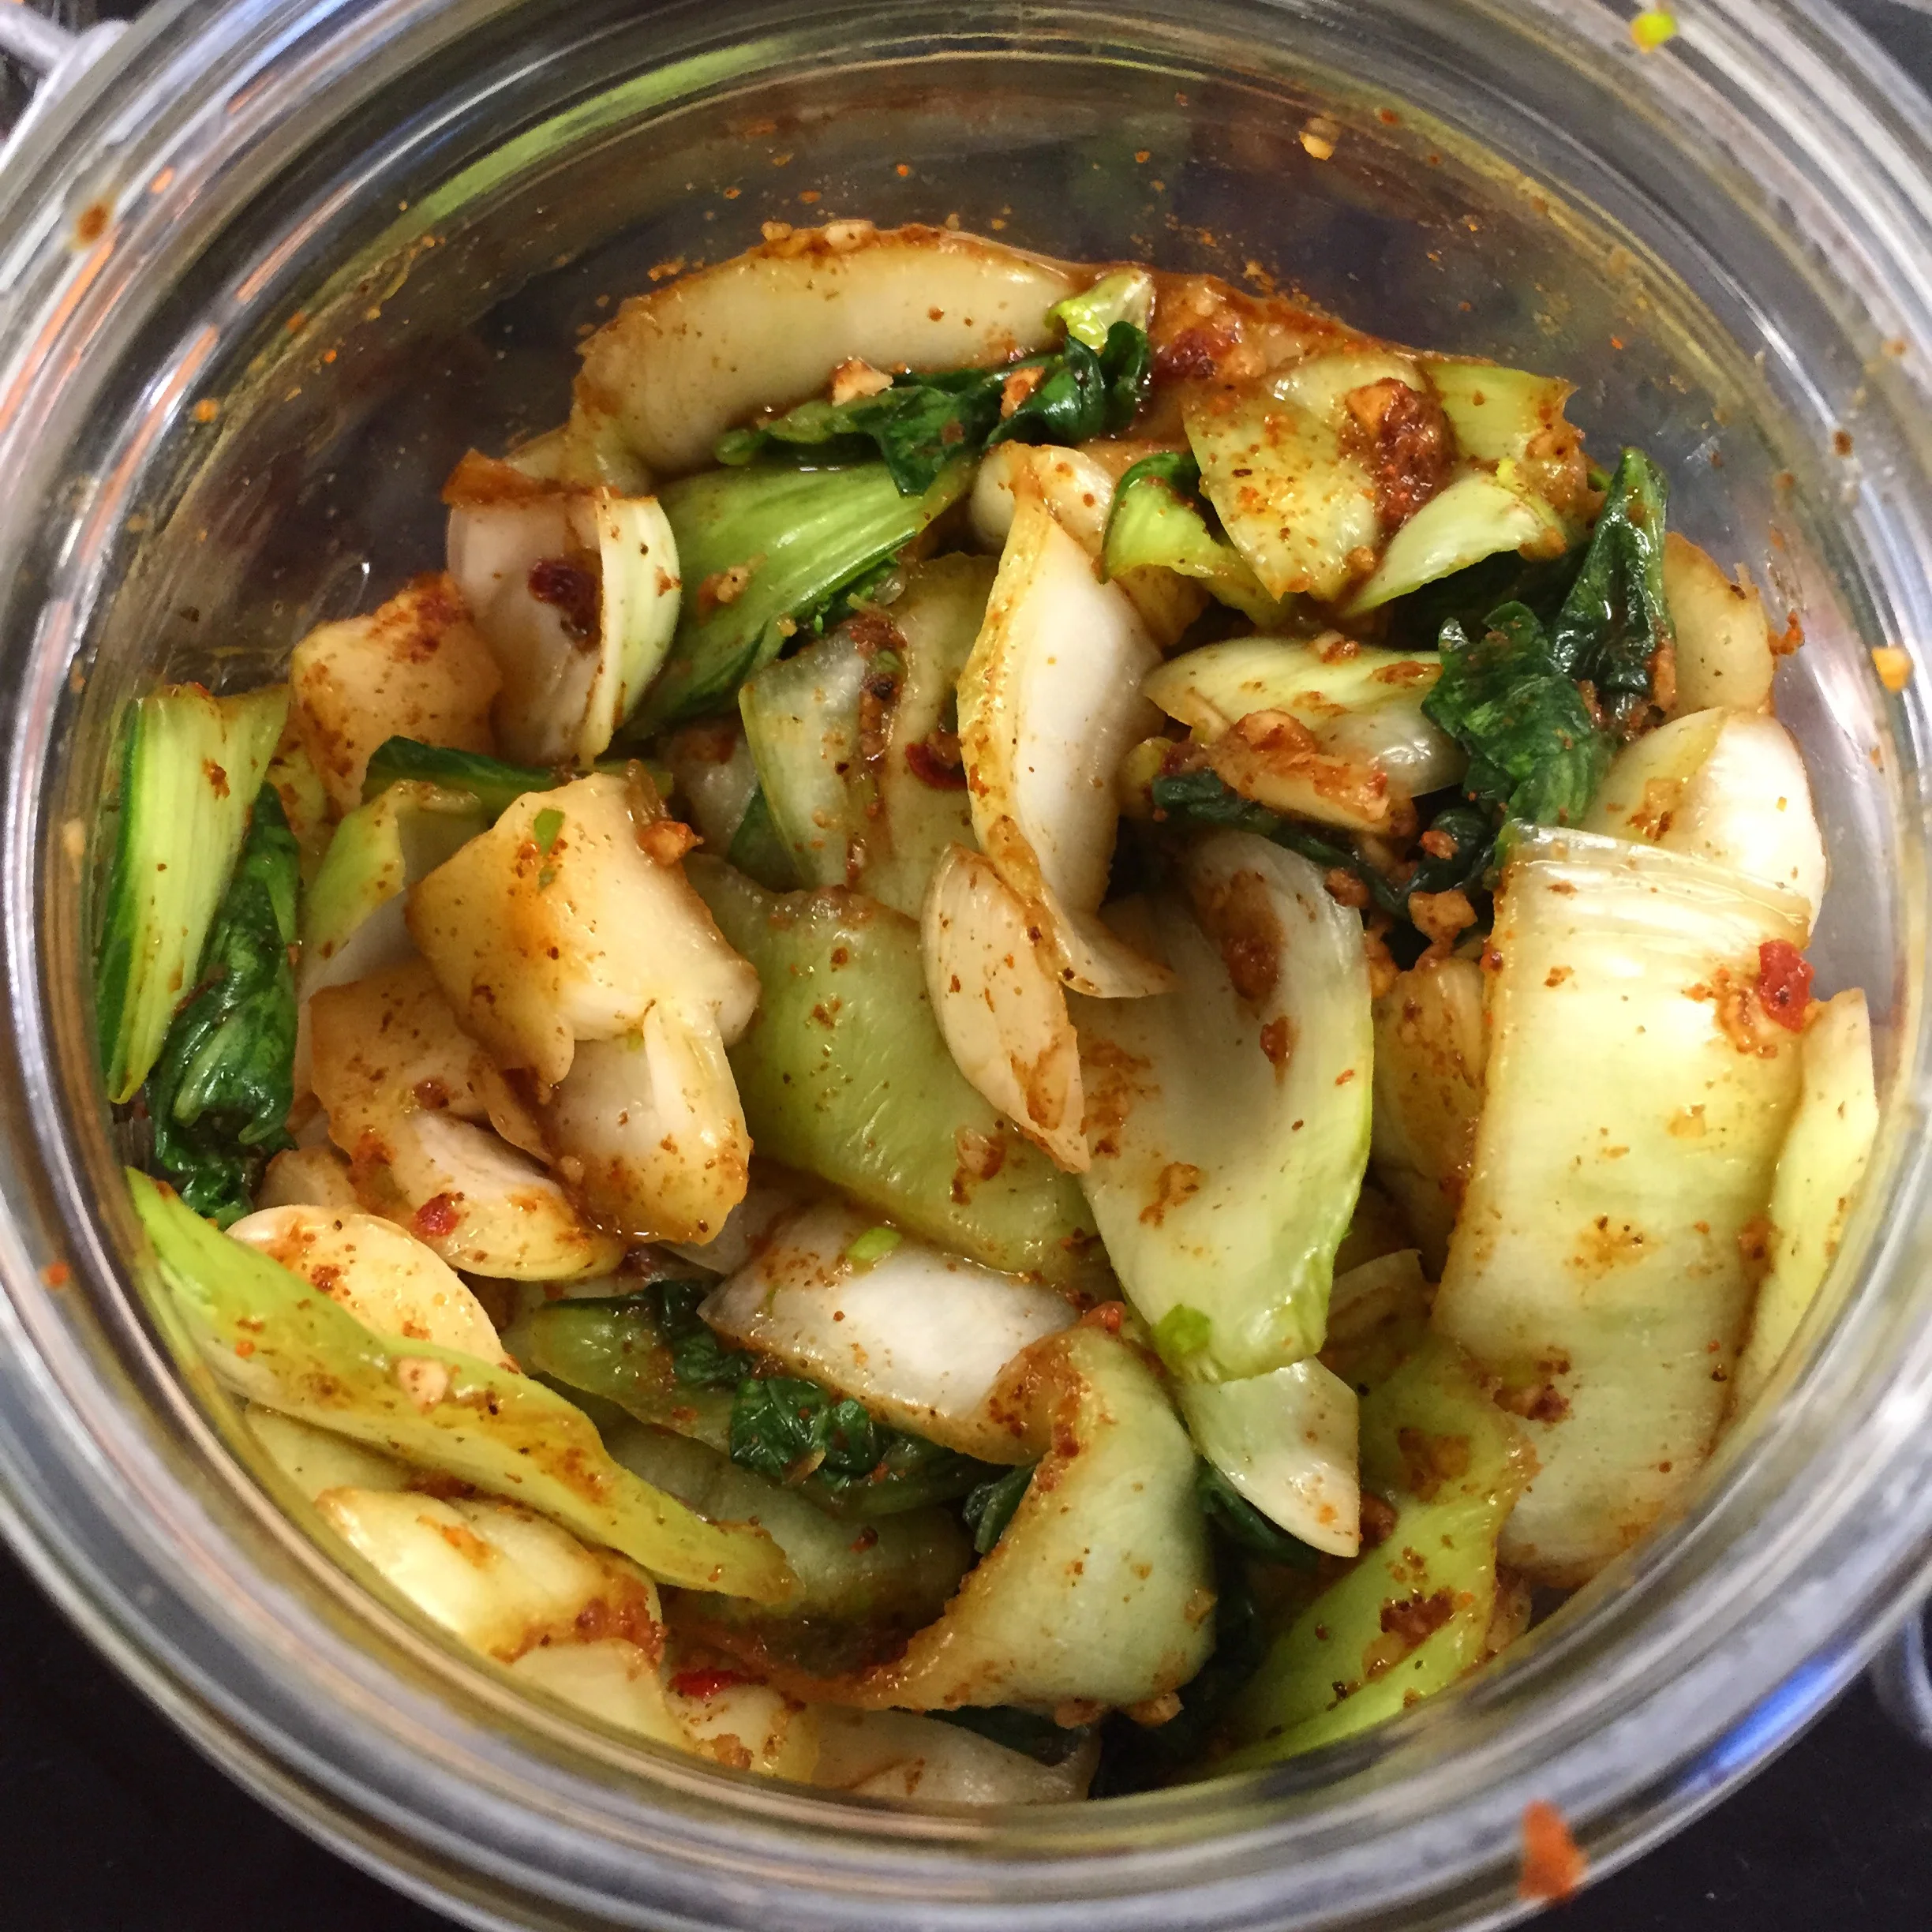
Mix the paste in with the cabbage
Use a little, mix in well and taste. You can always add more but you can't take it out. The hardcore kimchi makers say you should do this with your hands (and if you are authentically using quartered chinese cabbage, say, you will have to to get it between the leaves), but beware that any little paper cuts on your fingers, combined with salt and chilli is a fairly energising combination. You might also want to wear some catering style gloves - and definitely don't rub your eyes. All that salt and chilli - ouch.
Pack into a jar and submerge

The key thing to think of at this point is that you need to get all your leaves submerged. The lacto fermentation preservation is anaerobic (without oxygen) and any leaves in contact with the air could potentially turn nasty, in the worst case scenario become contaminated with botulism. Submerge.
You'll have generated lots of liquid, but if you need to add a little water. Pack all the leaves down as much as possible. You definitely don't want air bubbles. A wooden rolling pin is a potential ramming down tool, if someone kind hasn't made and sent you a hand turned kimchi press (see below).
Keep them submerged

I've found leaves (even floppy ones) to be springy, wilful blighters. As you press one side down the other side will insist on coming up. So you need some mechanism to keep them safely packed down below water level. I've successfully used the silicon strainer from my gravy separator, but that put the gravy separator out of action. I intend to find some nice flat Norfolk pebbles and boil them to sterilise them, but that hasn't happened yet. So my current submerging mechanism is an unromantic zip lock plastic bag, partially filled with water squeezed into the top of the kimchi jar.
Ferment and burp
You could eat a bit of the kimchi right away, but the idea is to do the lacto fermentation thing to preserve it. So leave it in the kitchen for a few days (I'm favouring five for mine). As it ferments it will generate gas, so it's important to unclip the jar to release the pressure. There are dire tales of exploding jars, and you really don't want that.
You'll notice a strong sour smell develop when you burp the jar. This is a good thing, no matter what the rest of the household says.
After your chosen number of days, pop the jar in the fridge to slow the fermentation. And eat.
Post Script
After I put my Kimchee making on Instagram, an unexpected parcel arrived and lo and behold the lovely and talented contemporary Suffolk woodturner Andy Coates had made me my own kimchee press. I love this very much.


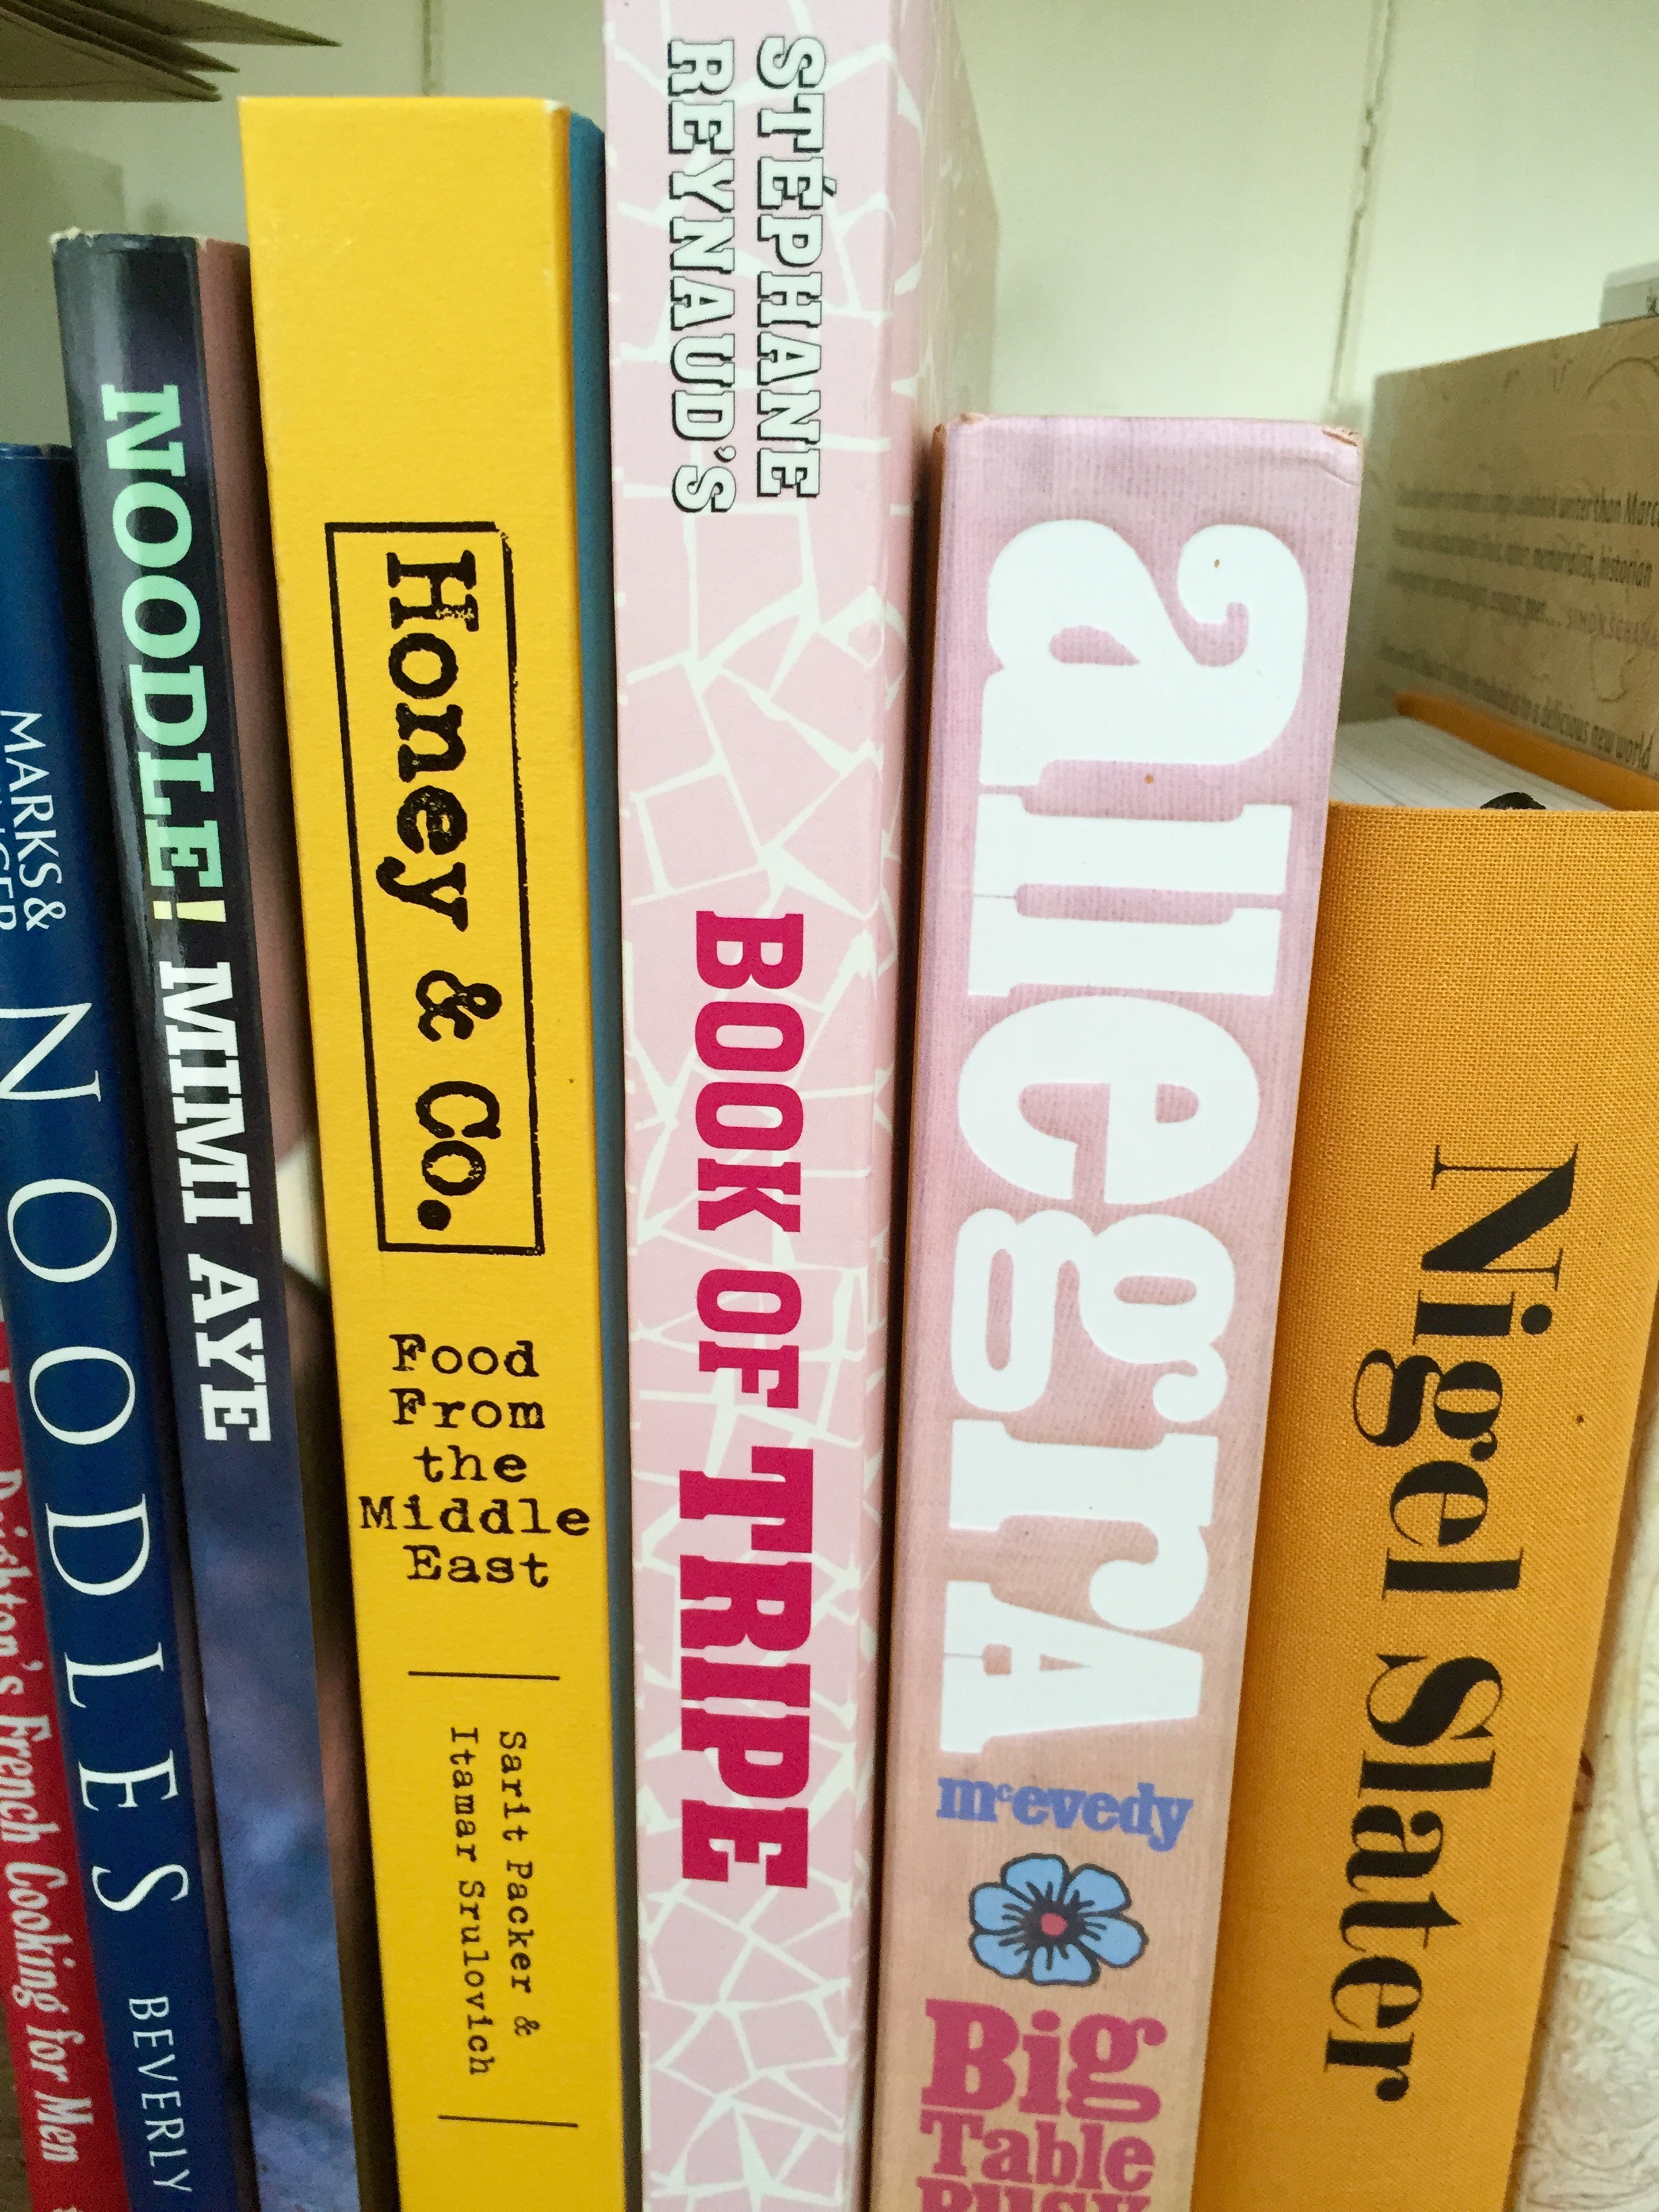
My currently in-use cook books
Let's play cookbook snap
I can't resist a good nosey in other people's bookshelves, so I thought I'd show you mine. These are the ones I have on the dresser at home at the moment, I tend to rotate, but some never get rotated out.
There's no music etc on here, so it's perfectly office friendly. Not that you would...